Convex Lenses and Ray Diagrams
Related Topics:
IGCSE Physics Lessons
Math Worksheets
Ray Diagrams for Concave Lens
Interactive Ray Diagrams
A series of free GCSE/IGCSE Physics Notes and Lessons.
Convex lenses are thicker at the center than at the edges and can form real or virtual images depending on the position of the object. A ray diagram for a convex lens is a graphical representation of how light rays converge or diverge after passing through the lens.
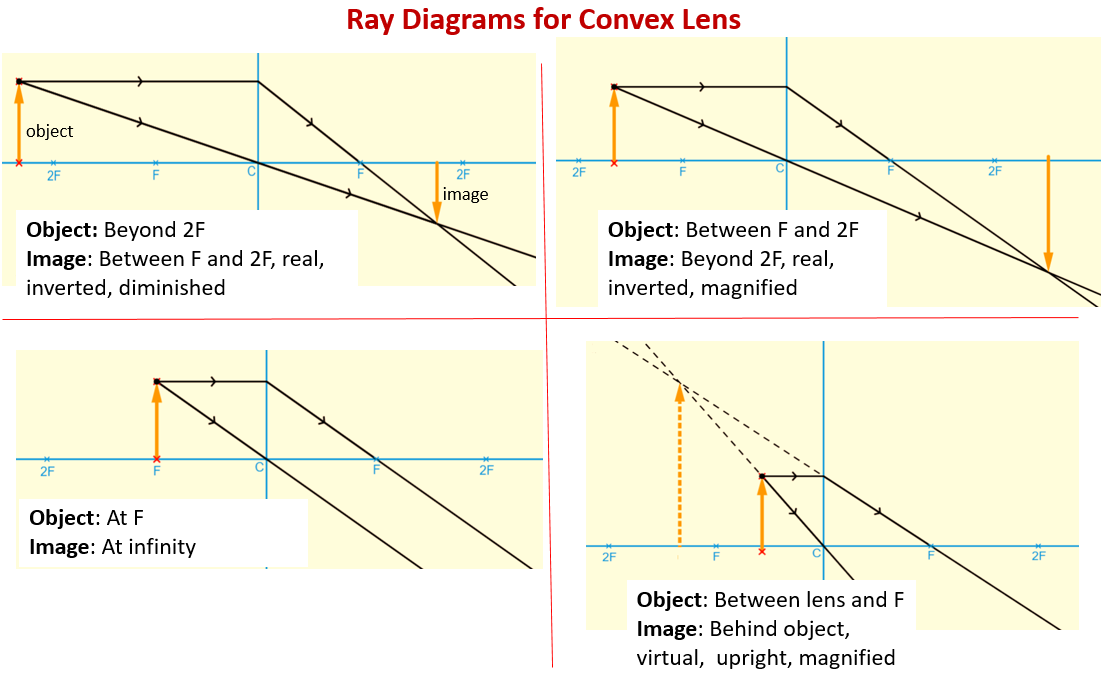
The following diagrams show the ray diagrams for convex lens: for objects at different distances from the lens.

Steps to Draw a Ray Diagram for a Convex Lens:
- Draw the Lens and Principal Axis:
Draw a vertical line representing the convex lens.
Draw a horizontal line through the center of the lens, representing the principal axis.
Mark the focal points (F) on both sides of the lens, equidistant from the center. - Draw the Object:
Draw an arrow representing the object, placed in front of the lens. The position of this object is what determines if the image is real or virtual. - Draw Ray 1 (Parallel Ray):
Draw a ray from the top of the object parallel to the principal axis, traveling towards the lens.
At the lens, draw the refracted ray passing through the focal point on the opposite side of the lens. - Draw Ray 2 (Focal Ray):
Draw a ray from the top of the object passing through the focal point on the same side of the lens as the object.
At the lens, draw the refracted ray traveling parallel to the principal axis. - Draw Ray 3 (Center Ray):
Draw a ray from the top of the object straight through the center of the lens. - Locate the Image:
The point where the three refracted rays intersect is where the top of the image is located.
Draw the image as an arrow from the principal axis to this intersection point.
If the refracted rays do not intersect, then trace the rays backwards, those lines will intersect on the same side of the lens as the object, creating a virtual image.
If the rays are parallel then no image is formed. - Image Characteristics:
The characteristics of the image depend on the object’s position relative to the focal length:
Object beyond 2F: Real, inverted, diminished.
Object at 2F: Real, inverted, same size.
Object between F and 2F: Real, inverted, magnified.
Object at F: No image formed (rays are parallel).
Object inside F: Virtual, upright, magnified.
Ray Diagrams: Converging Lenses
A converging lens (also known as a convex lens) brings light to a focus, resulting in the formation of a real image (an image formed by the convergence of rays of light).
This video explain the principles behind drawing lens ray diagrams for converging lenses and then demonstrate the drawing of two such diagrams:
The first where the object is further from the lens than the focus.
The second where the object is closer to the lens than the focus.
Ray Diagrams of Convex Lens
Describe what is meant by a convex lens?
How to draw ray diagrams to show the formation of an image by a convex lens?
Ray Diagrams For Lenses - (Magnifying Glass)
Draw a ray diagram to show how a convex lens can be used as a magnifying glass.
Try the free Mathway calculator and
problem solver below to practice various math topics. Try the given examples, or type in your own
problem and check your answer with the step-by-step explanations.

We welcome your feedback, comments and questions about this site or page. Please submit your feedback or enquiries via our Feedback page.